Creating a Wildfly Docker image with TimescaleDB support
Table of Contents
Introduction #
Wildfly docker image #
As a base image, we’ll use the latest official Wildfly docker image, named jboss/wildfly:24.0.0.Final.
Since TimescaleDB relies on PostgreSQL, we also need to setup the PostgreSQL driver and datasource in Wildfly. This requires the following:
- Download PostgreSQL driver from the official maven repository
- Adding PostgreSQL module
- Adding PostgreSQL driver
- Setup a main Datasource
Luckily, all these steps can be automated using jboss cli (located at /opt/jboss/wildfly/bin/jboss-cli.sh).
Here’s the full Dockerfile:
1FROM jboss/wildfly:24.0.0.Final 2 3ENV WILDFLY_USER admin 4ENV WILDFLY_PASS password 5ENV JBOSS_CLI /opt/jboss/wildfly/bin/jboss-cli.sh 6ENV DEPLOYMENT_DIR /opt/jboss/wildfly/standalone/deployments/ 7 8ENV DB_NAME sample-db 9ENV DB_USER postgres10ENV DB_PASS postgres11ENV DB_HOST db12ENV DB_PORT 543213ENV POSTGRESQL_VERSION 42.2.2314 15RUN echo "Building wildfly"16RUN echo "=> Adding administrator user"17RUN $JBOSS_HOME/bin/add-user.sh -u $WILDFLY_USER -p $WILDFLY_PASS --silent18 19RUN echo "=> Starting WildFly server" && \20 bash -c '$JBOSS_HOME/bin/standalone.sh &' && \21 echo "=> Waiting for the server to boot" && \22 bash -c 'until `$JBOSS_CLI -c ":read-attribute(name=server-state)" 2> /dev/null | grep -q running`; do echo `$JBOSS_CLI -c ":read-attribute(name=server-state)" 2> /dev/null`; sleep 1; done' && \23 echo "=> Downloading PostgreSQL driver" && \24 curl -k --location --output ./postgresql-${POSTGRESQL_VERSION}.jar --url https://repo1.maven.org/maven2/org/postgresql/postgresql/${POSTGRESQL_VERSION}/postgresql-${POSTGRESQL_VERSION}.jar && \25 echo "=> Adding PostgreSQL module" && \26 $JBOSS_CLI --connect --command="module add --name=org.postgresql --resources=./postgresql-${POSTGRESQL_VERSION}.jar --dependencies=javax.api,javax.transaction.api" && \27 echo "=> Adding PostgreSQL driver" && \28 $JBOSS_CLI --connect --command="/subsystem=datasources/jdbc-driver=postgresql:add(driver-name=postgresql,driver-module-name=org.postgresql,driver-class-name=org.postgresql.Driver,driver-xa-datasource-class-name=org.postgresql.xa.PGXADataSource)" && \29 echo "=> Adding main Datasource" && \30 $JBOSS_CLI --connect --command="data-source add \31 --name=PostgresDS \32 --jndi-name=java:jboss/datasources/PostgresDS \33 --user-name=${DB_USER} \34 --password=${DB_PASS} \35 --driver-name=postgresql \36 --connection-url=jdbc:postgresql://${DB_HOST}:${DB_PORT}/${DB_NAME} \37 --use-ccm=false \38 --blocking-timeout-wait-millis=5000 \39 --enabled=true" && \40 echo "=> Shutting down WildFly and Cleaning up" && \41 $JBOSS_CLI --connect --command=":shutdown" && \42 rm -rf $JBOSS_HOME/standalone/configuration/standalone_xml_history/ $JBOSS_HOME/standalone/log/* && \43 rm -f ./*.jar44 45EXPOSE 8080 9990 500546 47CMD ["/opt/jboss/wildfly/bin/standalone.sh", "-b", "0.0.0.0", "-bmanagement", "0.0.0.0", "--debug", "*:5005"]The following ports are exposed:
8080for the application9990for the admin console5005for debugging
Remember to specify the correct datasource in your project’s persistence.xml file:
1 2 java:jboss/datasources/PostgresDS3 ...Docker Compose #
For the docker-compose file, there are two services required:
- The modified Wildfly image with Timescale support, as seen above
- The Timescale instance
Both services are fully configurable through environment variables and are able to communicate using Docker’s bridge networks. Here’s the full docker-compose.yml:
1version: "2" 2 3services: 4 wildfly: 5 container_name: "wildfly" 6 build: 7 context: . 8 dockerfile: Dockerfile 9 environment:10 - WILDFLY_USER=admin11 - WILDFLY_PASS=password12 - DB_NAME=sample-db13 - DB_USER=postgres14 - DB_PASS=postgres15 - DB_HOST=db16 - DB_PORT=543217 depends_on:18 - db19 volumes:20 - ./workdir/deploy/wildfly/:/opt/jboss/wildfly/standalone/deployments/:rw21 ports:22 - "8080:8080"23 - "9990:9990"24 - "5005:5005"25 26 db:27 container_name: "db"28 image: "timescale/timescaledb:latest-pg13"29 environment:30 - POSTGRES_DB=sample-db31 - POSTGRES_USER=postgres32 - POSTGRES_PASSWORD=postgres33 volumes:34 - ./workdir/db/init/:/docker-entrypoint-initdb.d/35 - ./workdir/db/data/:/var/lib/postgresql/36 ports:37 - "5432:5432"38 39networks:40 default:41 driver: bridgeNote that:
- Wildfly image is automatically fetched from the
Dockerfile, which should be in the same folder as thedocker-compose.yml - Thanks to docker’s volume mapping, you can add
.warfiles in theworkdir/deploy/wildflyand they will be deployed to Wildfly automatically - Database data is persisted in the
workdir/dbfolder even when the container is destroyed. However, remember to sethibernate.hbm2ddl.autoproperty toupdatein yourpersistence.xmlfile, in order to avoid losing your data between launches.
To start the services, simply run docker-compose up from any terminal instance.
Enabling TimescaleDB Hypertables in Java #
First, create a class named CustomPostgreSQLDialect that extends PostgreSQL95Dialect and registers the OTHER sql type as a String:
1import org.hibernate.dialect.PostgreSQL95Dialect;2import java.sql.Types;3 4public class CustomPostgreSQLDialect extends PostgreSQL95Dialect { 5 public CustomPostgreSQLDialect() {6 super();7 registerHibernateType(Types.OTHER, String.class.getName());8 }9}This is required since Timescale’s create_hypertable return value is not natively supported by Hibernate. If you skip this step, you’ll most likely end up with an error such as:
javax.persistence.PersistenceException: org.hibernate.MappingException: No Dialect mapping for JDBC type: 1111Then, specify CustomPostgreSQLDialect as the Hibernate dialect in your project’s persistence.xml file:
1 2 3 ...4 5 ...Finally, enable TimescaleDB extension on the database and then create the hypertable:
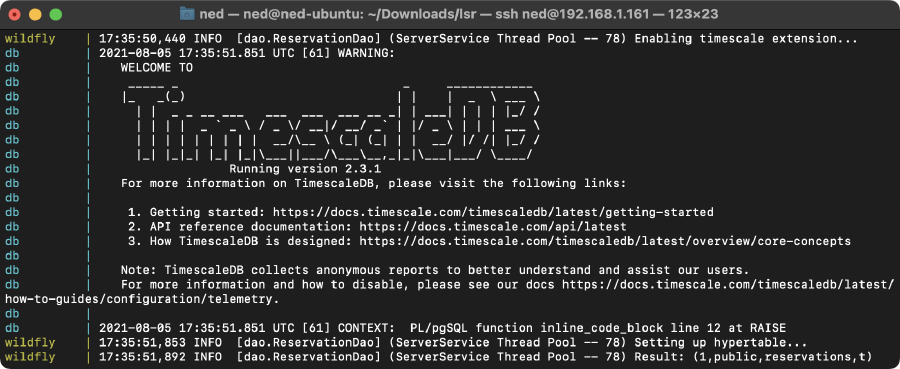
1// Enable TimescaleDB extension2entityManager.createNativeQuery("CREATE EXTENSION IF NOT EXISTS timescaledb;").executeUpdate();3 4// Create hypertable5String result = entityManager.createNativeQuery(6 "SELECT create_hypertable('YOUR_TABLE_HERE', 'YOUR_TIME_COLUMN_HERE')"7).getSingleResult().toString();8 9LOGGER.info(String.format("Result: %s", result));If all went well, you should see something like this in the logs:
Result: (1,public,YOUR_TABLE_HERE,t)
For more details on hypertables refer to the offical TimescaleDB documentation.
References #
- TimescaleDB
- Docker-Test_DevEnv project by BrizziB
- Creating a Wildfly Docker image with PostgreSQL by mikesir87